【iOS】ダークモードに対応させる
はじめに
最近はダークモード対応のアプリもだいぶリリースされてきて,ダークモード対応はマストかなと感じています.つくよです.
そんなに難しい物ではないですが,アプリ起動中にライト・ダーク切り替えると変わらない要素があったりとちょっと注意が必要です.
画像と色をAssets Catalog管理する
画像
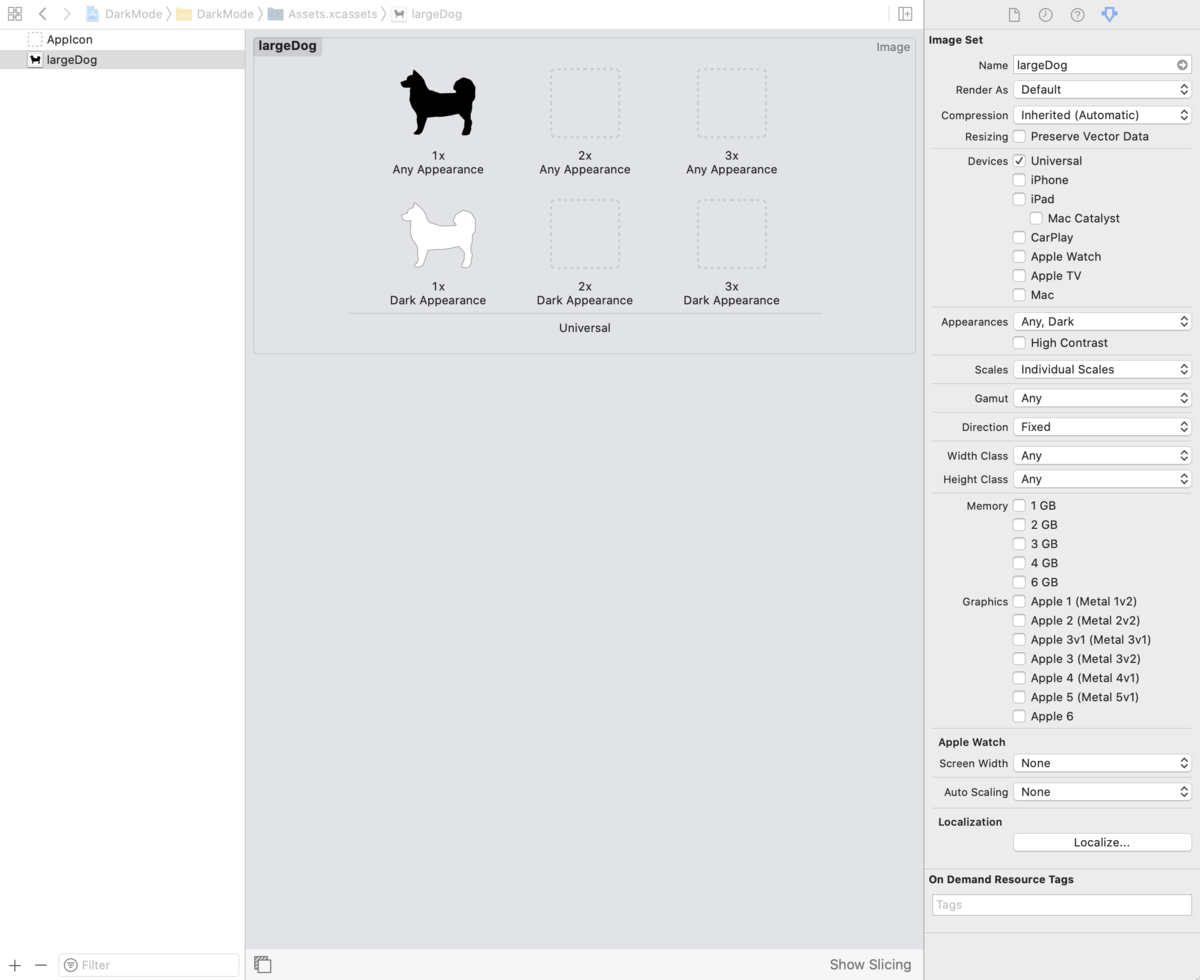
いつも通り画像をAssets Catalogにドラッグして登録

選択すると右のインスペクター?にAppearancesと言う項目があるので
その項目をNoneからAny, Darkに変更しましょう.
変更すると画像の枠が下に追加されます. そこにダークモード時の画像を登録しておきましょう.
色
Assets Catalogの項目一覧の部分で右クリック.
すると項目にNew Color Setの項目があるのでクリック

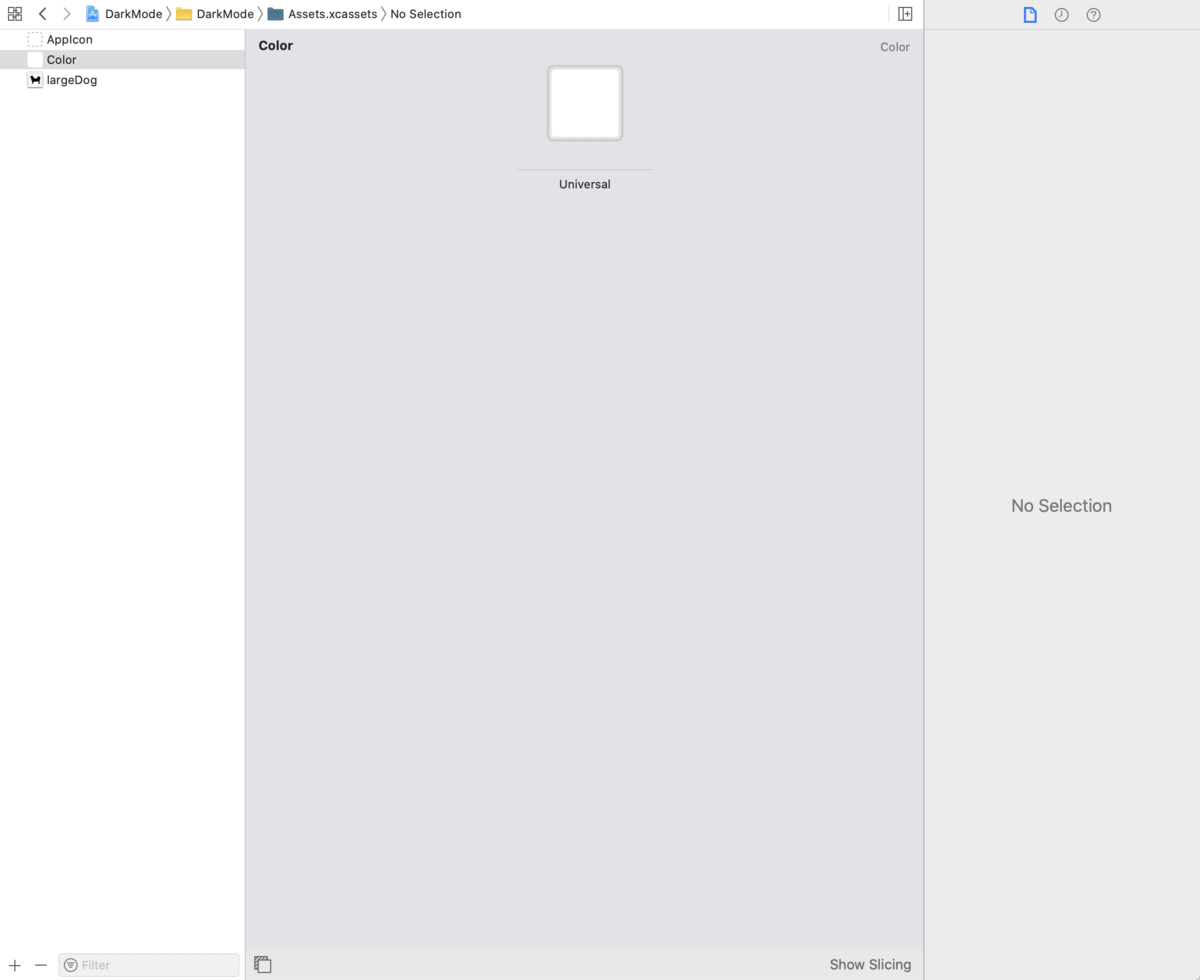
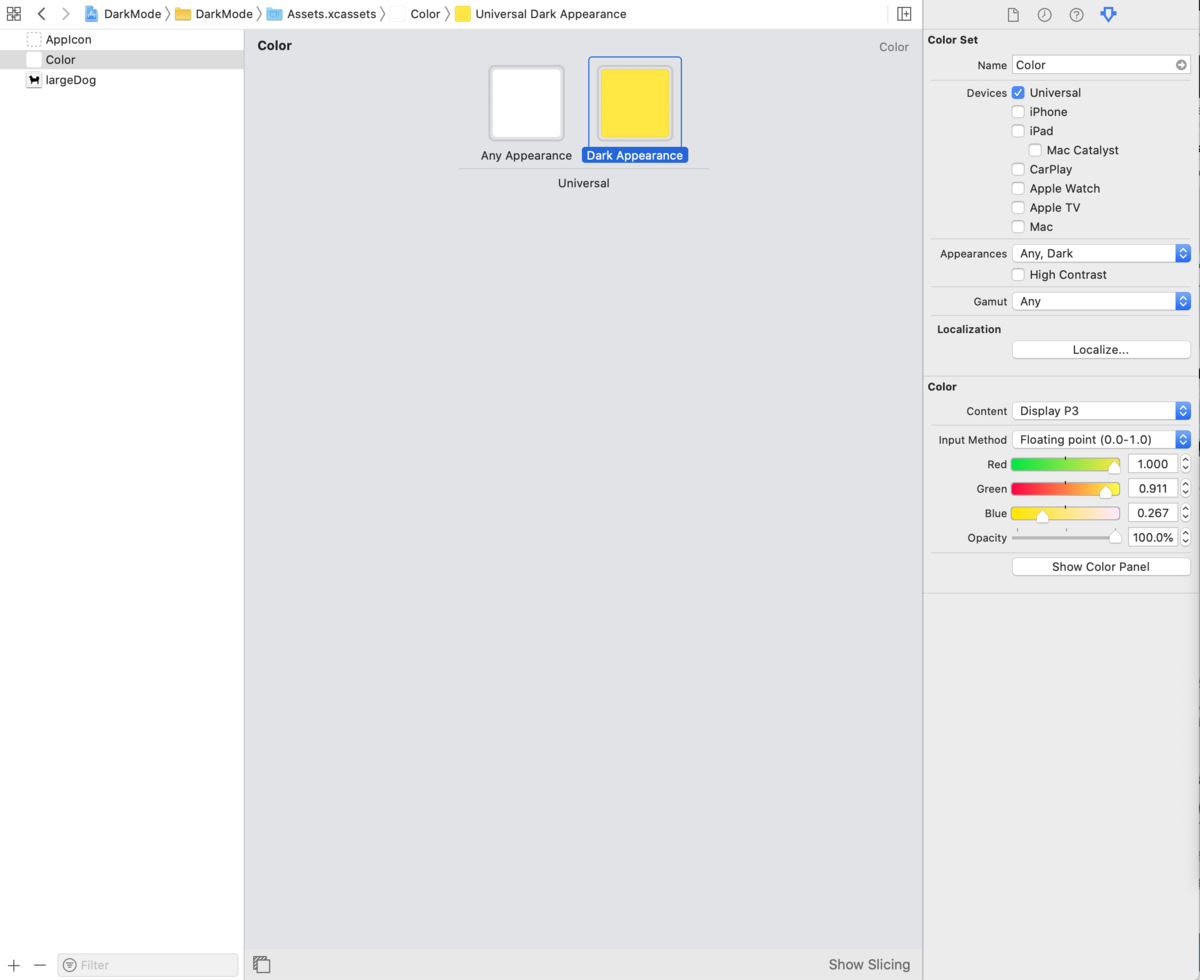
そして選択すると,画像の時と同じく右のところにAppearancesと言う項目があるので
その項目をNoneからAny, Darkに変更しましょう.
右のShow Color Panelを選択して好きに色を選択しておきましょう.
プログラムでの設定
StoryBoardからのやり方は多分同じだと思うので コードベースでのやり方を書きます.
import UIKit

class ViewController: UIViewController {

    let titleLabel: UILabel = {
        var test = UILabel()
        test.font = .systemFont(ofSize: 30)
        test.text = "アイウエオ"
        // ↓名前で指定する
        test.textColor = UIColor(named: "Color")
        test.textAlignment = .center
        test.numberOfLines = 1
        test.minimumScaleFactor = 0.5
        test.translatesAutoresizingMaskIntoConstraints = false
        return test
    }()

    let img: UIImageView = {
        var test = UIImageView()
        // ↓色同様に名前で指定する
        test.image = UIImage(named: "largeDog")
        test.contentMode = .scaleAspectFill
        test.translatesAutoresizingMaskIntoConstraints = false
        return test
    }()

    let btn: UIButton = {
        let button = UIButton(type: UIButton.ButtonType.system)
        button.backgroundColor = .white
        button.setTitle("これまでのタネ", for: .normal)
        button.setTitleColor(UIColor(named: "Color"), for: .normal)
        button.titleLabel?.font = UIFont.systemFont(ofSize: 30)
        button.layer.cornerRadius = 10
        button.layer.borderColor = UIColor(named: "Color")?.cgColor
        button.layer.borderWidth = 3
        button.translatesAutoresizingMaskIntoConstraints = false
        return button
    }()


    override func viewDidLoad() {
        super.viewDidLoad()

        view.addSubview(titleLabel)
        view.addSubview(img)
        view.addSubview(btn)

        setUpAutoLayout()
    }


    func setUpAutoLayout() {
        titleLabel.centerXAnchor.constraint(equalTo: self.view.safeAreaLayoutGuide.centerXAnchor).isActive = true
        titleLabel.topAnchor.constraint(equalTo: view.safeAreaLayoutGuide.topAnchor).isActive = true
        titleLabel.widthAnchor.constraint(equalTo: view.safeAreaLayoutGuide.widthAnchor, multiplier: 0.8).isActive = true
        titleLabel.heightAnchor.constraint(equalToConstant: 100).isActive = true

        img.widthAnchor.constraint(equalTo: titleLabel.widthAnchor).isActive = true
        img.topAnchor.constraint(equalTo: titleLabel.bottomAnchor, constant: 100).isActive = true
        img.heightAnchor.constraint(equalToConstant: 100).isActive = true
        img.centerXAnchor.constraint(equalTo: view.centerXAnchor).isActive = true

        btn.centerXAnchor.constraint(equalTo: view.centerXAnchor).isActive = true
        btn.topAnchor.constraint(equalTo: img.bottomAnchor, constant: 100).isActive = true
        btn.widthAnchor.constraint(equalTo: titleLabel.widthAnchor).isActive = true
        btn.heightAnchor.constraint(equalToConstant: 100).isActive = true
    }

}
実行画面
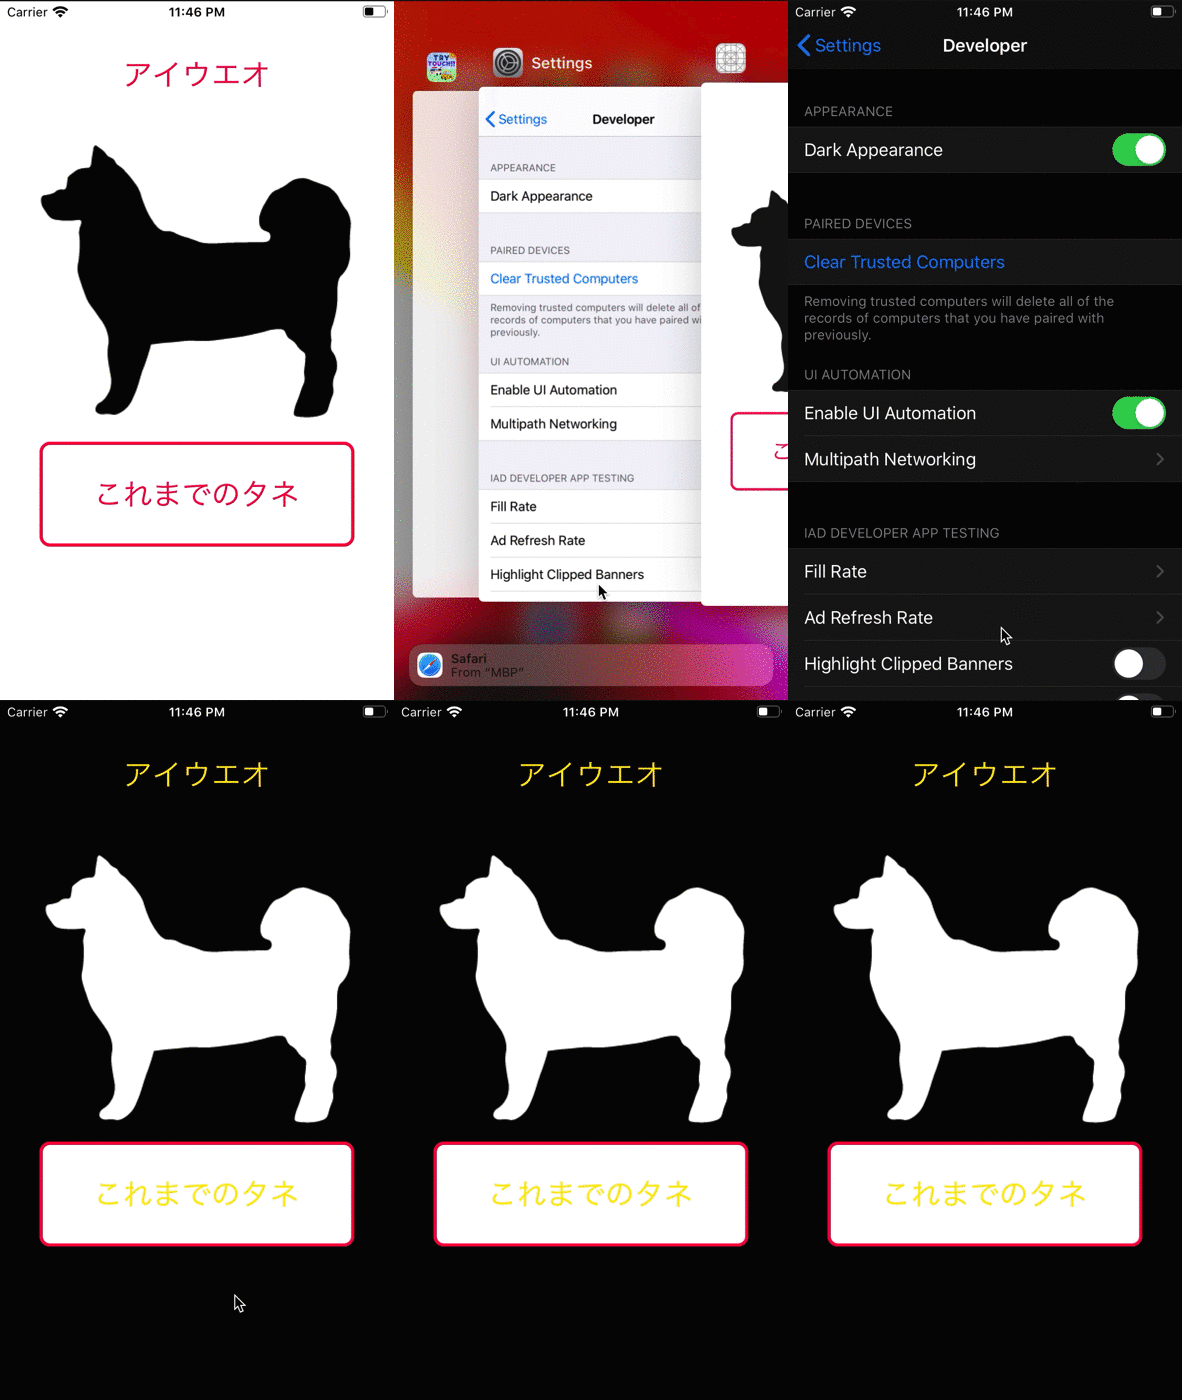
見てもらうと分かるとおり
ボタンの枠の色が変わりません.
直しましょう.
直し方は非常に簡単でtraitCollectionDidChange()をオーバーライドして, モード切り替えを検出するだけです.
import UIKit

class ViewController: UIViewController {

    let titleLabel: UILabel = {
        var test = UILabel()
        test.font = .systemFont(ofSize: 30)
        test.text = "アイウエオ"
        // ↓名前で指定する
        test.textColor = UIColor(named: "Color")
        test.textAlignment = .center
        test.numberOfLines = 1
        test.minimumScaleFactor = 0.5
        test.translatesAutoresizingMaskIntoConstraints = false
        return test
    }()

    let img: UIImageView = {
        var test = UIImageView()
        // ↓色同様に名前で指定する
        test.image = UIImage(named: "largeDog")
        test.contentMode = .scaleAspectFill
        test.translatesAutoresizingMaskIntoConstraints = false
        return test
    }()

    let btn: UIButton = {
        let button = UIButton(type: UIButton.ButtonType.system)
        button.backgroundColor = .white
        button.setTitle("これまでのタネ", for: .normal)
        button.setTitleColor(UIColor(named: "Color"), for: .normal)
        button.titleLabel?.font = UIFont.systemFont(ofSize: 30)
        button.layer.cornerRadius = 10
        button.layer.borderColor = UIColor(named: "Color")?.cgColor
        button.layer.borderWidth = 3
        button.translatesAutoresizingMaskIntoConstraints = false
        return button
    }()


    override func viewDidLoad() {
        super.viewDidLoad()

        view.addSubview(titleLabel)
        view.addSubview(img)
        view.addSubview(btn)

        setUpAutoLayout()
    }

    // ↓今回追加 ダークモード変化を知る
    override func traitCollectionDidChange(_ previousTraitCollection: UITraitCollection?) {
        guard let pt = previousTraitCollection else { return }
        if #available(iOS 13.0, *) {
            if pt.hasDifferentColorAppearance(comparedTo: self.traitCollection) {
                btn.layer.borderColor = UIColor(named: "Color")?.cgColor
            }
        }
    }


    func setUpAutoLayout() {
        titleLabel.centerXAnchor.constraint(equalTo: self.view.safeAreaLayoutGuide.centerXAnchor).isActive = true
        titleLabel.topAnchor.constraint(equalTo: view.safeAreaLayoutGuide.topAnchor).isActive = true
        titleLabel.widthAnchor.constraint(equalTo: view.safeAreaLayoutGuide.widthAnchor, multiplier: 0.8).isActive = true
        titleLabel.heightAnchor.constraint(equalToConstant: 100).isActive = true

        img.widthAnchor.constraint(equalTo: titleLabel.widthAnchor).isActive = true
        img.topAnchor.constraint(equalTo: titleLabel.bottomAnchor, constant: 100).isActive = true
        img.heightAnchor.constraint(equalToConstant: 100).isActive = true
        img.centerXAnchor.constraint(equalTo: view.centerXAnchor).isActive = true

        btn.centerXAnchor.constraint(equalTo: view.centerXAnchor).isActive = true
        btn.topAnchor.constraint(equalTo: img.bottomAnchor, constant: 100).isActive = true
        btn.widthAnchor.constraint(equalTo: titleLabel.widthAnchor).isActive = true
        btn.heightAnchor.constraint(equalToConstant: 100).isActive = true
    }

}

色を変えることができました. 非常に簡単に色・画像をライト・ダークモード対応にすることができました.
ボタンの枠線など忘れがちなので今回説明いたしました.
おわりに
今回使用した,LargeDogの画像を使用している僕が作ったアプリ
「DogAge Converter」をAppStoreで是非ダウンロードしてみてください.
非常にシンプルなアプリで人間の年齢を犬の年齢に変換できます.
それだけです.
是非,以下からダウンロードよろしくお願いいたします.
apps.apple.com